Here you will find all the information in regard to iPacky Metafields which is a powerful feature for entering product notes, virtual products, barcode aliases (B-aliases) and bin location (Bin).
Only users with Administrator, Supervisor or Operator roles can access this screen.
It’s highly recommended that you do an Export to Excel once in a while as a backup. We also warn against multiple people using this screen at the same time. This might overwrite the values.
It’s recommended that if you quickly want to edit metafields for some products, you should use the Edit Metafield function. It will be much faster without loading all the products.
https://youtu.be/lvAQ9_0UgiM
When entering the screen which is shown below, you have to click on Load products. This will load all the shop’s products into memory for easy and fast searching. This might take time if your store has thousands of products. Loading will continue in the background if you go to other screens in Dashboard. We recommend loading only the active products from Shopify, since this is much faster.
These notes/virtual products will be saved on the product variants as metafields in Shopify, and will be there regardless of iPacky. This means that this data will not disappear if iPacky is uninstalled, and are also available for other apps to use.
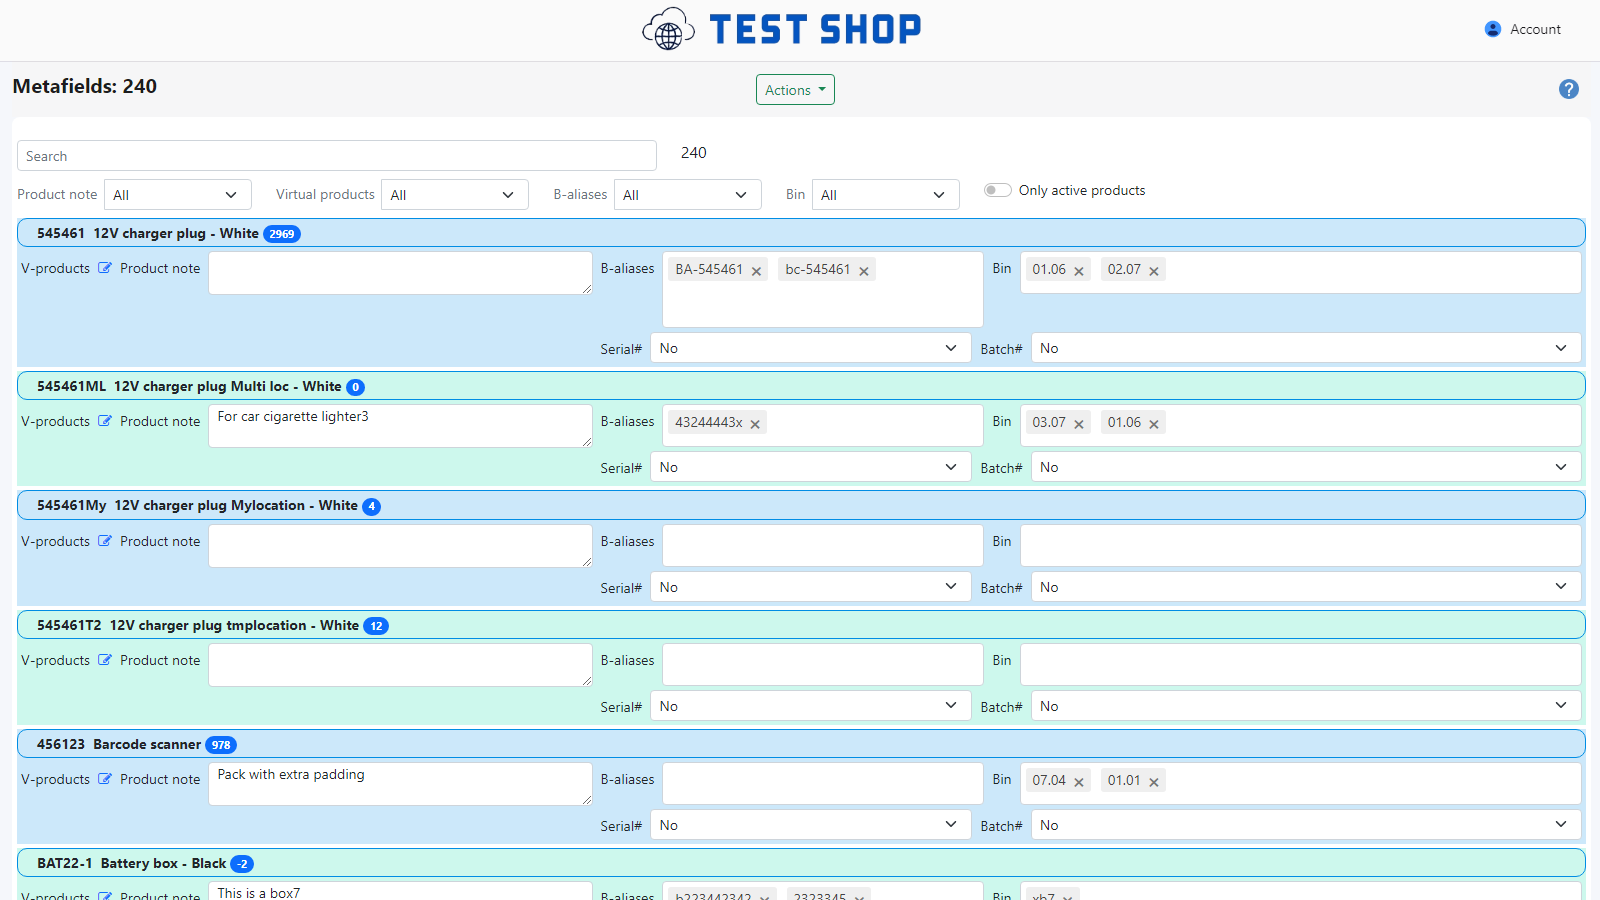
When the load has completed, a list will appear. The number in the blue pill after the product name is the on hand inventory.
If you have turned on support for Shopify locations, the bin location and inventory count will be the values for this Shopify location. This means that the bin location will be different for each Shopify location.
The serial/batch# fields show here are only available when the Serial/Batch module is installed.
In the filter field, you can search on SKU, name, vendor, and type, and the list will change to show your matches.
You can also filter on filled/unfilled Product notes/Virtual products/B-aliases and Bin. And sort on product name (default), or product create date.
NOTE: The page will warn you about unsaved changes when going to the next or a previous page, but It will not warn about unsaved changes if you exit this screen.
Bin location (Bin)
To show bin location in scan screen and iPacky picking lists, you must turn on “Show bin location” in Settings→View. Also, the “Sort order lines on” in Settings→Layout should be set to use Bin location. Read about how it is used in picking lists. If you don’t want the bin location to be shown on the order check screen, turn on Settings→View→ORDER CHECK→Hide bin location on scan screen
Bin location is used to specify where the product is stored in the warehouse. This will be shown in the scan screen, and on iPacky’s packing lists.
This will optimize the picking path to make sure that the pickers use the most efficient route.
The bin location is per Shopify location if you have activated the support for Shopify locations in iPacky.
If a product has more than one bin location, for example if it has a main bin location and a refill bin location, you can enter all of them.
Use this opportunity to really plan your warehouse organizing.
You can use your own variant metafield in Shopify for bin location. You must contact iPacky support if you want to do this. But this is not recommended because of the following limitations:
- It will not support multiple Shopify locations if you use that and have different bin locations per Shopify location
- It’s safer and quicker to edit the bin location in iPacky
- The users don’t need to have access to Shopify. By using the iPacky metafield you can limit which users that can edit the bin location
- The bin location will be read-only in iPacky, so you cannot edit the bin location in iPacky
- You cannot do a Bin location lookup in iPacky to find out what products should be in a specified bin location
Best practices:
- Use a format that can be sorted, for example “01.02” where 01 is the row, and 02 is the column. Another example “02.04.03” (Row 2, Column 4, shelf 3)
- Do not start with one digit, and end up with 2 digits. This is because 11 will come before 2 when sorted
- Plan for enough digits so that there is room for expansion of the warehouse
- Use leading 0 if you plan to have more digits
- The dot is not needed, but it makes it easier to read
- You can of course specify it as “AB.D.02”. The key is to make sure it’s sorted correctly
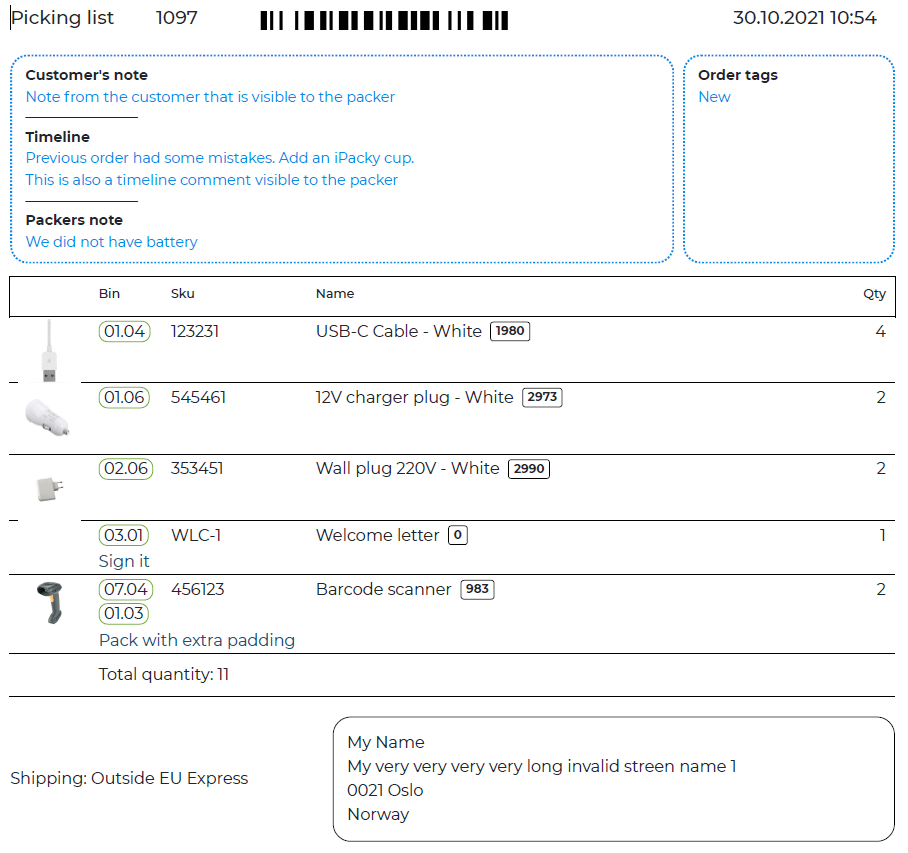
The view of the bin locations can look like the one below. Here it’s sorted on bin location in the Bin column:
HTSUS
This was a temporary fix when Shopify did not support individual customs code per country. Now we recommend using the native Shopify support.
The HTSUS field is used to enter the US customs code for a variant. iPacky will use this when sending to the US when using our shipping connectors, such as Webshipper, Sendcloud, Starshipit etc.
For bulk updates, do an export to Excel, make the changes, and import again.
For edit of single variants, fill in the HTSUS field in Edit metafield.
Product Notes
If there are special instructions (for example handling notes or product explanation), this will show them to the packer as Product notes.
These notes are visible when using the built-in picking list print feature in iPacky.
The note will appear on order lines in iPacky. It can look like in the example below:
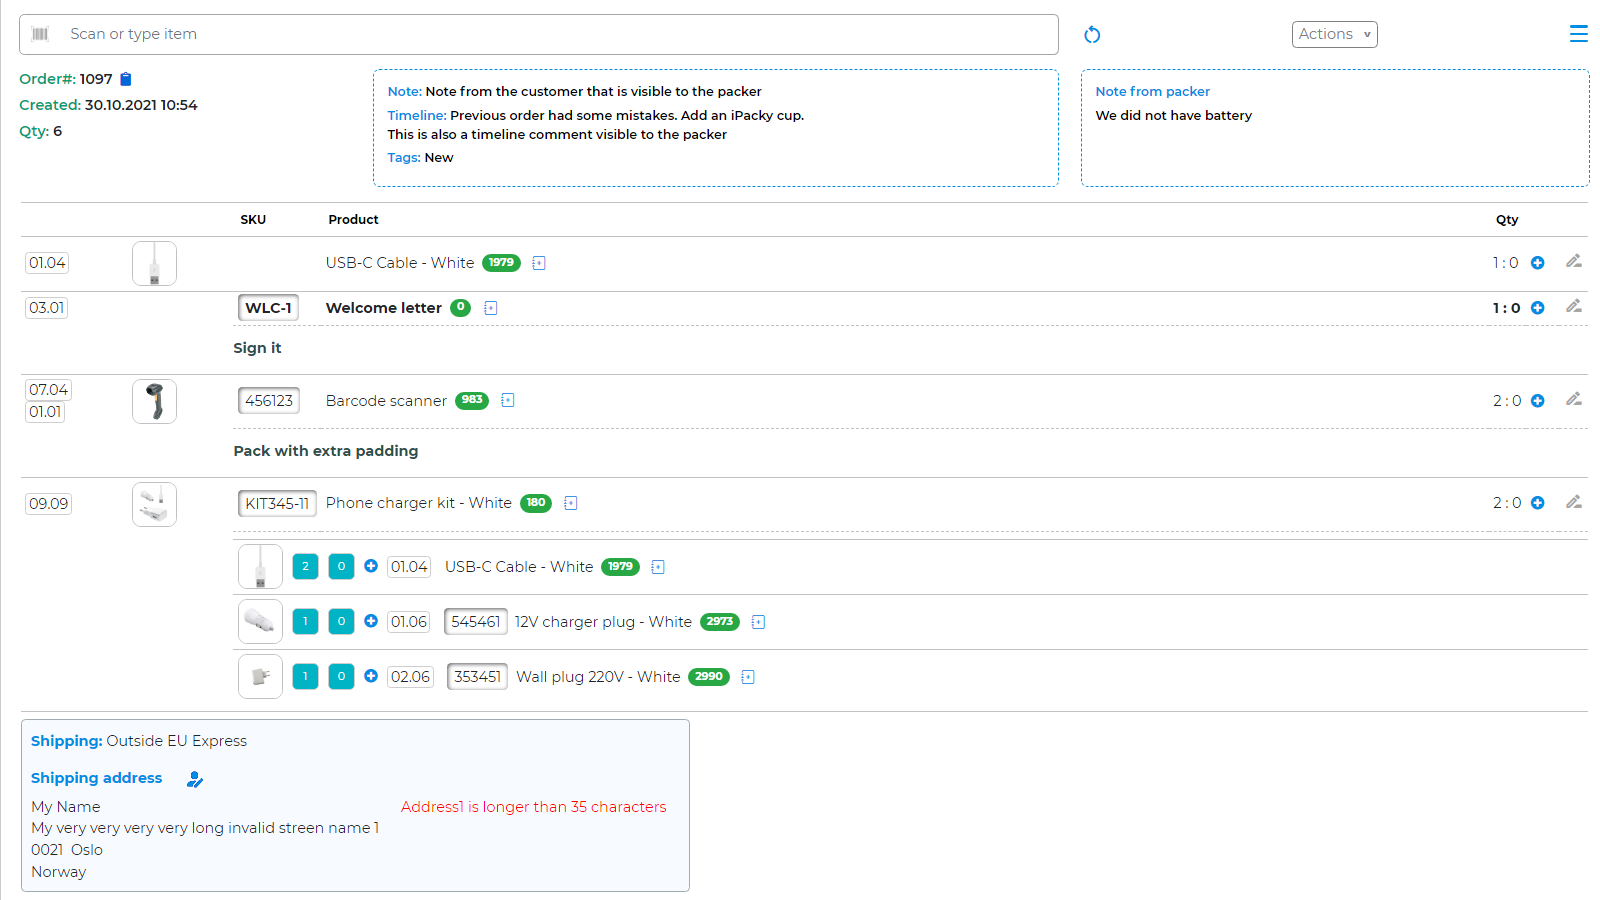
The iPacky main screen menu has a Picking list entry in the menu. There, you can print out picking lists. It can look like this:
Barcode aliases (B-aliases)
Barcode aliases fix an issue in Shopify where a product can only have one barcode.
In B-aliases you can specify several barcodes.
This is very useful for example when a batch is received with wrong barcodes, or you have several suppliers of the same product, and each supplier use their own barcode.
Note: There is no need to use this field if the product has only one barcode because that should be entered in the barcode field on the product in Shopify.
When scanning a barcode, the logic is as follows:
- The system first searches in main products for the barcode and increments the quantity scanned.
- If found amongst main products, but the main product has reached the required quantity (i.e. the scanned qty is the same as the order qty), the system starts to look in all virtual product members in all order lines. It will also do this if the barcode is not found in the main product category.
- If found in virtual product members, it increments the scanned quantity on the found virtual product. If more are scanned than the order quantity requires, it gives a message that the barcode is not found. It also changes the color of this virtual product to cyan if not fully completed, or green if fully completed.
- When all the barcodes for member of a virtual product are completed, it increments the virtual product scanned qty, and all member’s quantity scanned are reset. If the virtual product is completed, the system will not accept more scans.
NOTE: It’s possible to have a product both in an order line and also as a member in another order line. For example, a 24V charger plug might be on an order line by itself, and also then as a member of a kit because the customer ordered both. In this case, iPacky will first complete the order line with a 24V charger plug and then start on the member’s 24V charger plug.
Users can still edit the scanned quantities or enter the barcode of the virtual product. Therefore, it’s recommended that the virtual product does not have a barcode since it’s actually a kit. If the kit is prepacked with a barcode, then there is no need for a virtual product.
You cannot manually edit the scanned quantity of a virtual product members in an order, but by using the + button you can manually increment it.
Virtual Products
Virtual products make it possible to add members to a product variant, typically a kit/bundle.
We really recommend connecting to the Bundles app instead because it’s much more flexible, and also updates the inventory of bundled products. How it looks in iPacky will be exactly the same when checking orders.
Example:
The parent product (main product) Phone charger kit – White has the following children (sub-products):
- 1x24V charger plug
- 1xWall plug
- 2xUSB-C cable
In the V products column it’s either a number and the edit icon, or just the edit icon. The number shows how many members there are in that virtual product. If none, just the edit icon will be visible.
To add, edit or remove members, click on the edit icon.
This dialog will then appear with the current members:
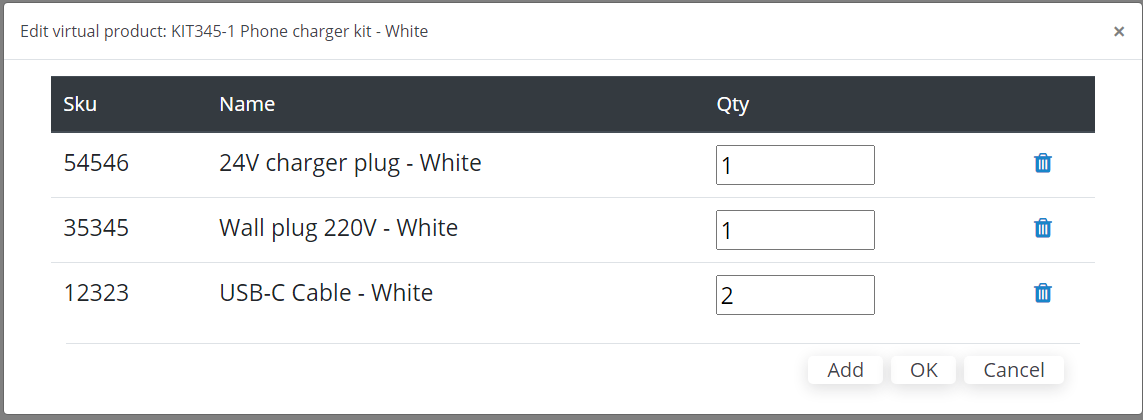
Here you can add or remove members.
The changes are not saved until you click Save on the main screen. By clicking OK, you accept the changes made. Cancel will abort the changes.
By clicking on Add, a dialog will appear:
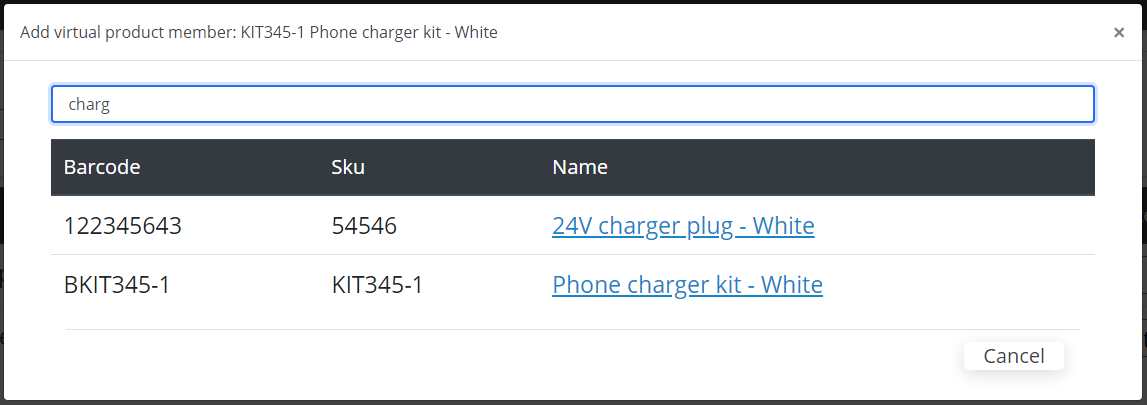
By typing in the input field it will show matches by SKU, name, barcode and vendor.
Select by clicking on the link on the product.
NOTE: A bundle product must not have the same barcode/SKU as any other product. So, if you have a phone and a phone kit, they must be listed as separate products in Shopify, even if the phone is a part of the phone kit.
The example below is presenting an order with a product that has virtual products, product notes and bin location (green frame):
Import/Export
Export allows you to export Product notes, Barcode aliases and Bin location to an Excel (highly recommended) or a CSV file. You can also open the CSV file in for example Excel, make changes, and import it back in iPacky.
There is also an Import by SKU from Excel. This is only recommended if you don’t have the product variant id in your file. The file format is the same, except for the missing Id column (which will be ignored). This import also requires that all your products have a SKU. The following columns must exist in the CSV import file, and the separator must be a comma: SKU, Bin location.
We highly recommend that you do an export before doing an import. That way you have a backup in case something is wrong with the import data. This should be done from time to time anyway.
Virtual products cannot be imported/exported.
There are some pitfalls with Excel trying to be too smart with CSV. Follow these instructions to avoid any issues. This only applies to CSV files loaded in Excel, and not Excel files.
- Since the delimiter used in CSV files vary with world regions, make sure that you have set the correct CSV file delimiter in Settings→Advanced. For the US, the delimiter is comma (,), and in most of Europe it is semicolon (;). If Excel does not separate the columns, you’re most likely using the wrong delimiter for your region
- Make a copy of the exported CSV file. In case something happens, you can import the original file back. This can also be used as a backup of your metafield settings
- After it opens in Excel, mark each column header and set the format to Text. This ensures that when you change a cell value, Excel will not try to convert to a number, date etc
- You might notice that some values are using a ‘ prefix in front of the value. This is only to instruct Excel that it is a text value and not use “smart” logic. This ‘prefix will be removed on import to iPacky. When you type in values, you don’t need to include the ‘ prefix
- Barcode aliases might be separated by a semicolon to force Excel to understand that it should not be converted to a number. When you type in values in B-aliases, the best is to separate the barcodes with semicolon, but comma will also work
This applies to Excel import
The import file MUST have the Id in the first column, and any Product note, Barcode aliases or Bin location column(s). The header line with the column name must be present. The columns not included will be ignored, and will not update the metafields. So if you only want to update the Bin location, your Excel file can have only the Id and Bin location columns. The other columns are informational, and will be ignored.
This applies to both Excel and CSV:
- Separate barcode aliases with comma (,) or semicolon (;). Semicolon is recommended. The same for multiple Bin location.
- The only values that will be imported are the Product note, Barcode aliases and Bin location columns. Changing SKU or Name columns will have no effect
- Deleting rows will not remove the metafield info in iPacky
- Do NOT change the values of the Id column because this is the unique key to match the product on import. Do not rearrange the columns (applies to CSV) or change the column headers either. This will abort the import.